## Highlights
- 🤖 AI decision engine with OpenAI-compatible models (GPT, Claude, DeepSeek, etc.)
- 🔌 Native MCP implementation with HTTP/stdio/SSE transports and external MCP federation
- 🧰 100+ prebuilt tool recipes + YAML-based extension system
- 📄 Large-result pagination, compression, and searchable archives
- 🔗 Attack-chain graph, risk scoring, and step-by-step replay
- 🔒 Password-protected web UI, audit logs, and SQLite persistence
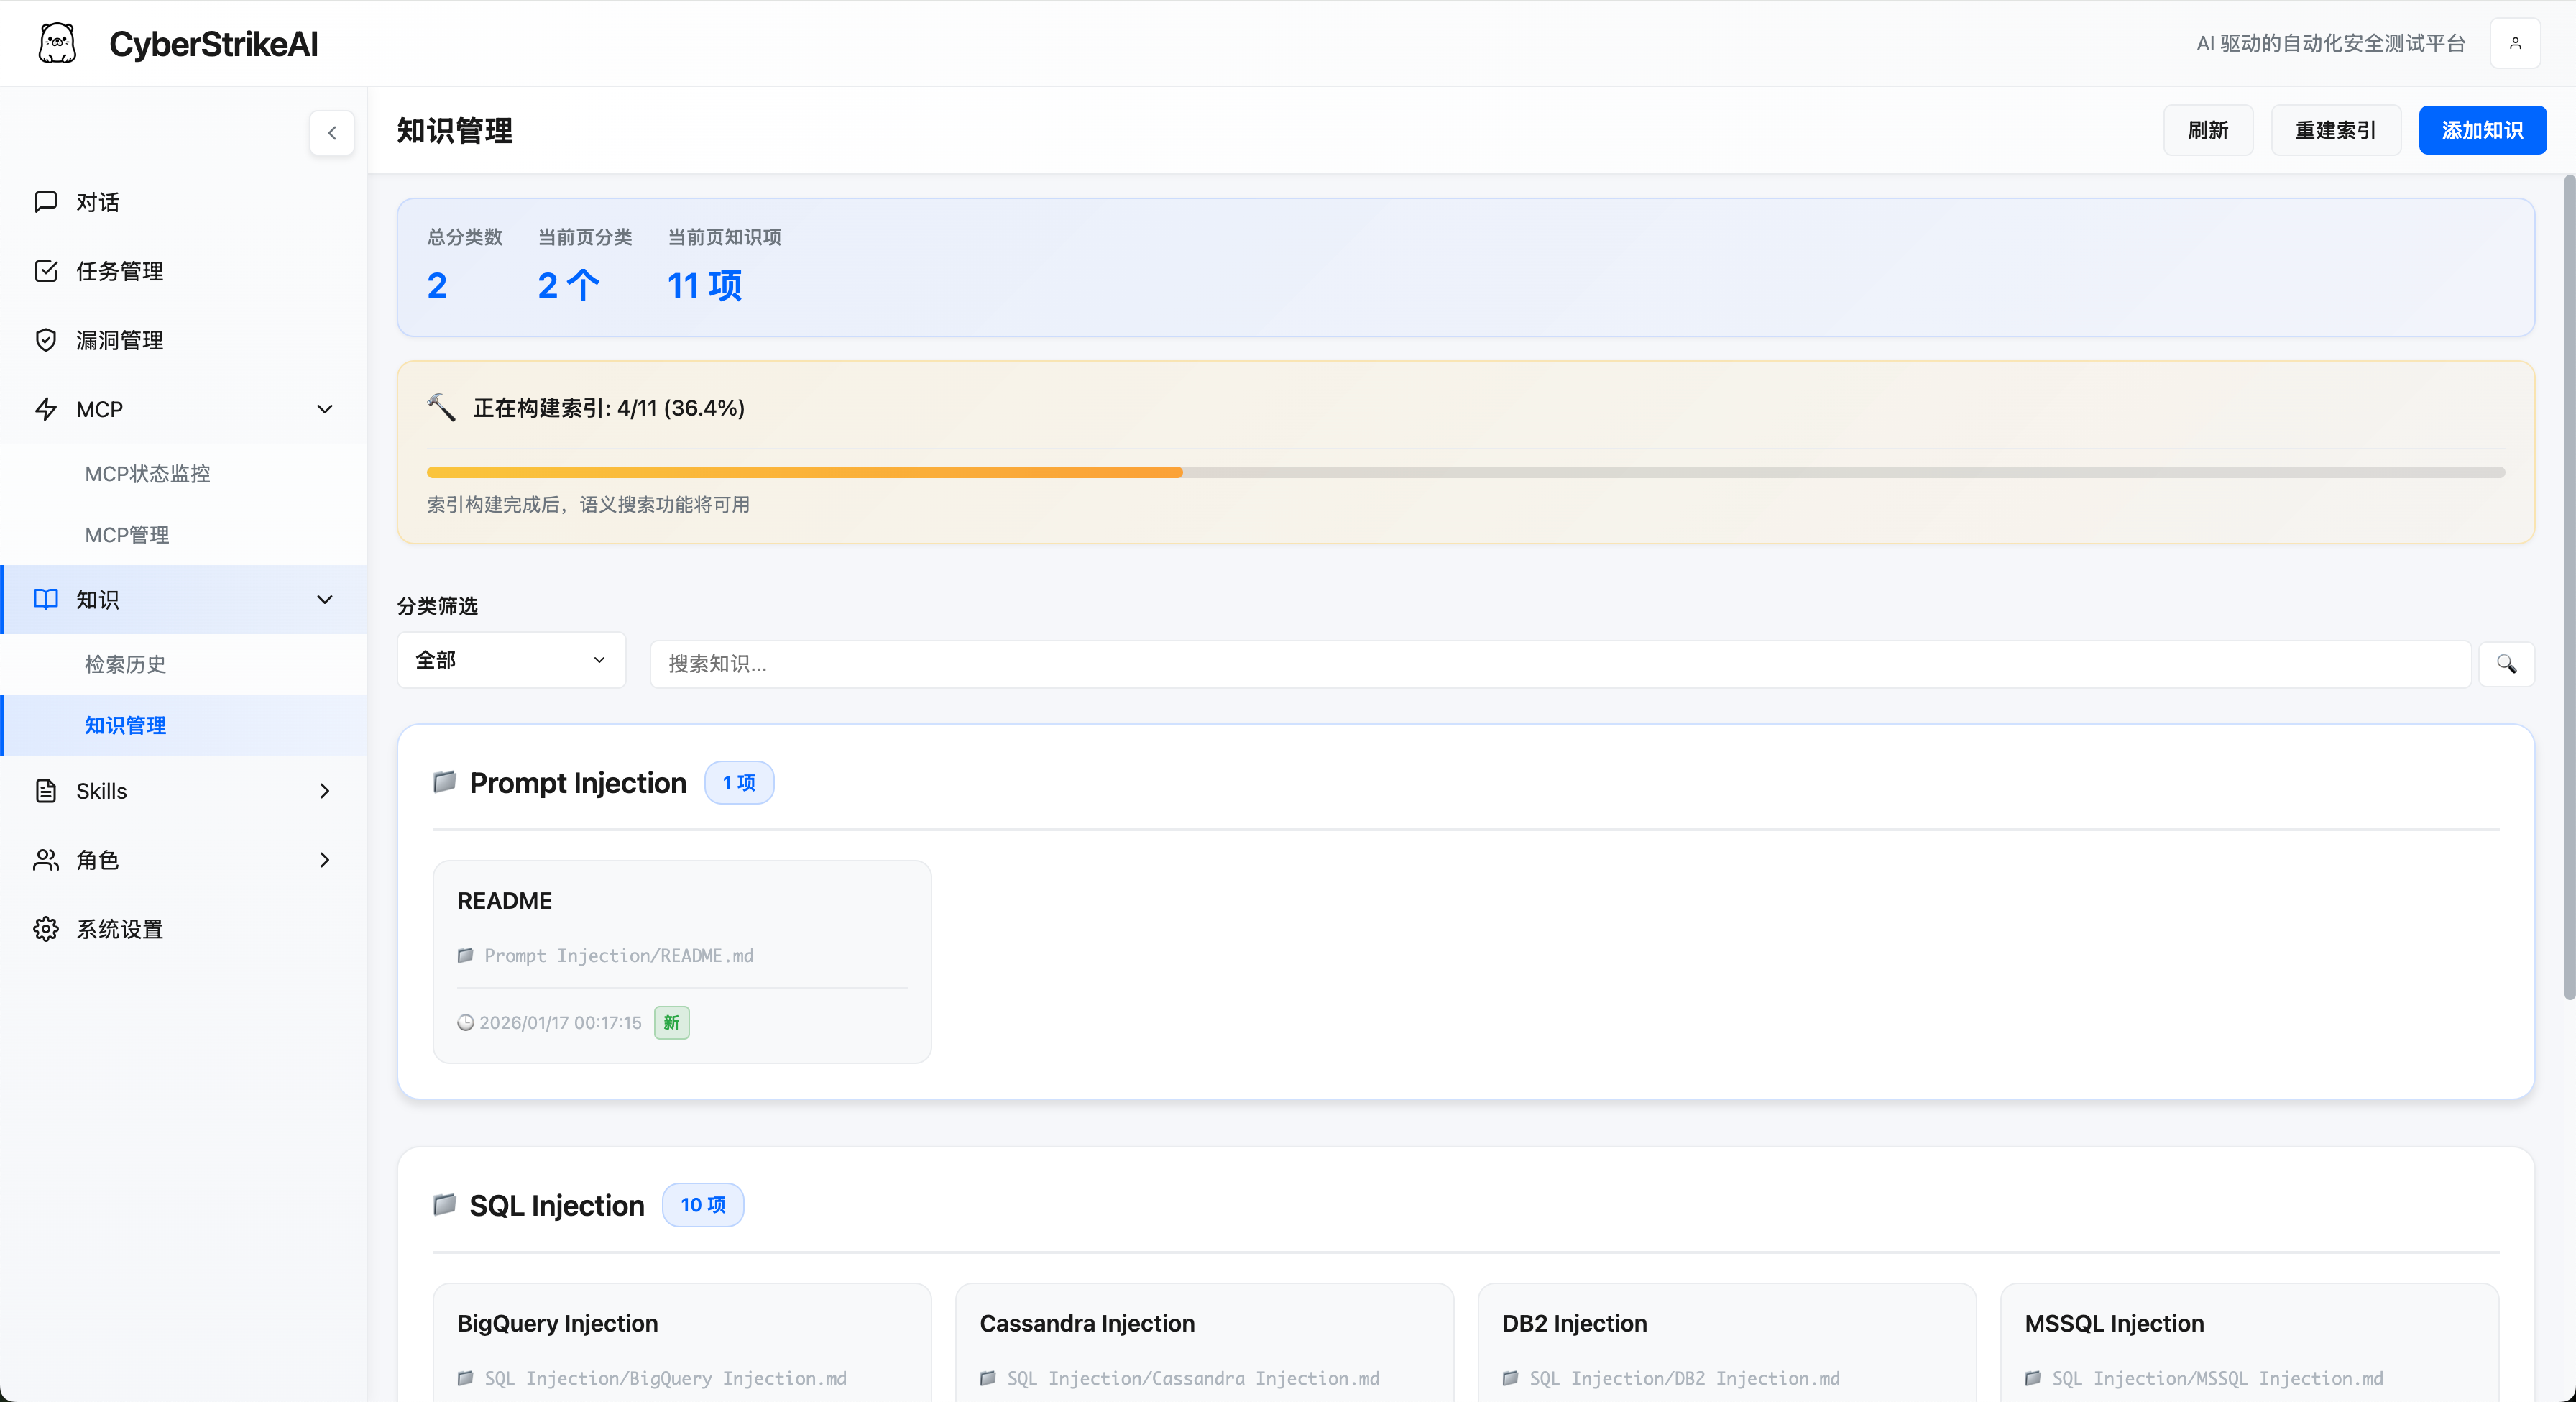
- 📚 Knowledge base with vector search and hybrid retrieval for security expertise
- 📁 Conversation grouping with pinning, rename, and batch management
- 🛡️ Vulnerability management with CRUD operations, severity tracking, status workflow, and statistics
- 📋 Batch task management: create task queues, add multiple tasks, and execute them sequentially
- 🎭 Role-based testing: predefined security testing roles (Penetration Testing, CTF, Web App Scanning, etc.) with custom prompts and tool restrictions
- 🧩 **Multi-agent mode (Eino DeepAgent)**: optional orchestration where a coordinator delegates work to Markdown-defined sub-agents via the `task` tool; main agent in `agents/orchestrator.md` (or `kind: orchestrator`), sub-agents under `agents/*.md`; chat mode switch when `multi_agent.enabled` is true (see [Multi-agent doc](docs/MULTI_AGENT_EINO.md))
- 🎯 Skills system: 20+ predefined security testing skills (SQL injection, XSS, API security, etc.) that can be attached to roles or called on-demand by AI agents
- 📱 **Chatbot**: DingTalk and Lark (Feishu) long-lived connections so you can talk to CyberStrikeAI from mobile (see [Robot / Chatbot guide](docs/robot_en.md) for setup and commands)
- 🐚 **WebShell management**: Add and manage WebShell connections (e.g. IceSword/AntSword compatible), use a virtual terminal for command execution, a built-in file manager for file operations, and an AI assistant tab that orchestrates tests and keeps per-connection conversation history; supports PHP, ASP, ASPX, JSP and custom shell types with configurable request method and command parameter.
## Plugins
CyberStrikeAI includes optional integrations under `plugins/`.
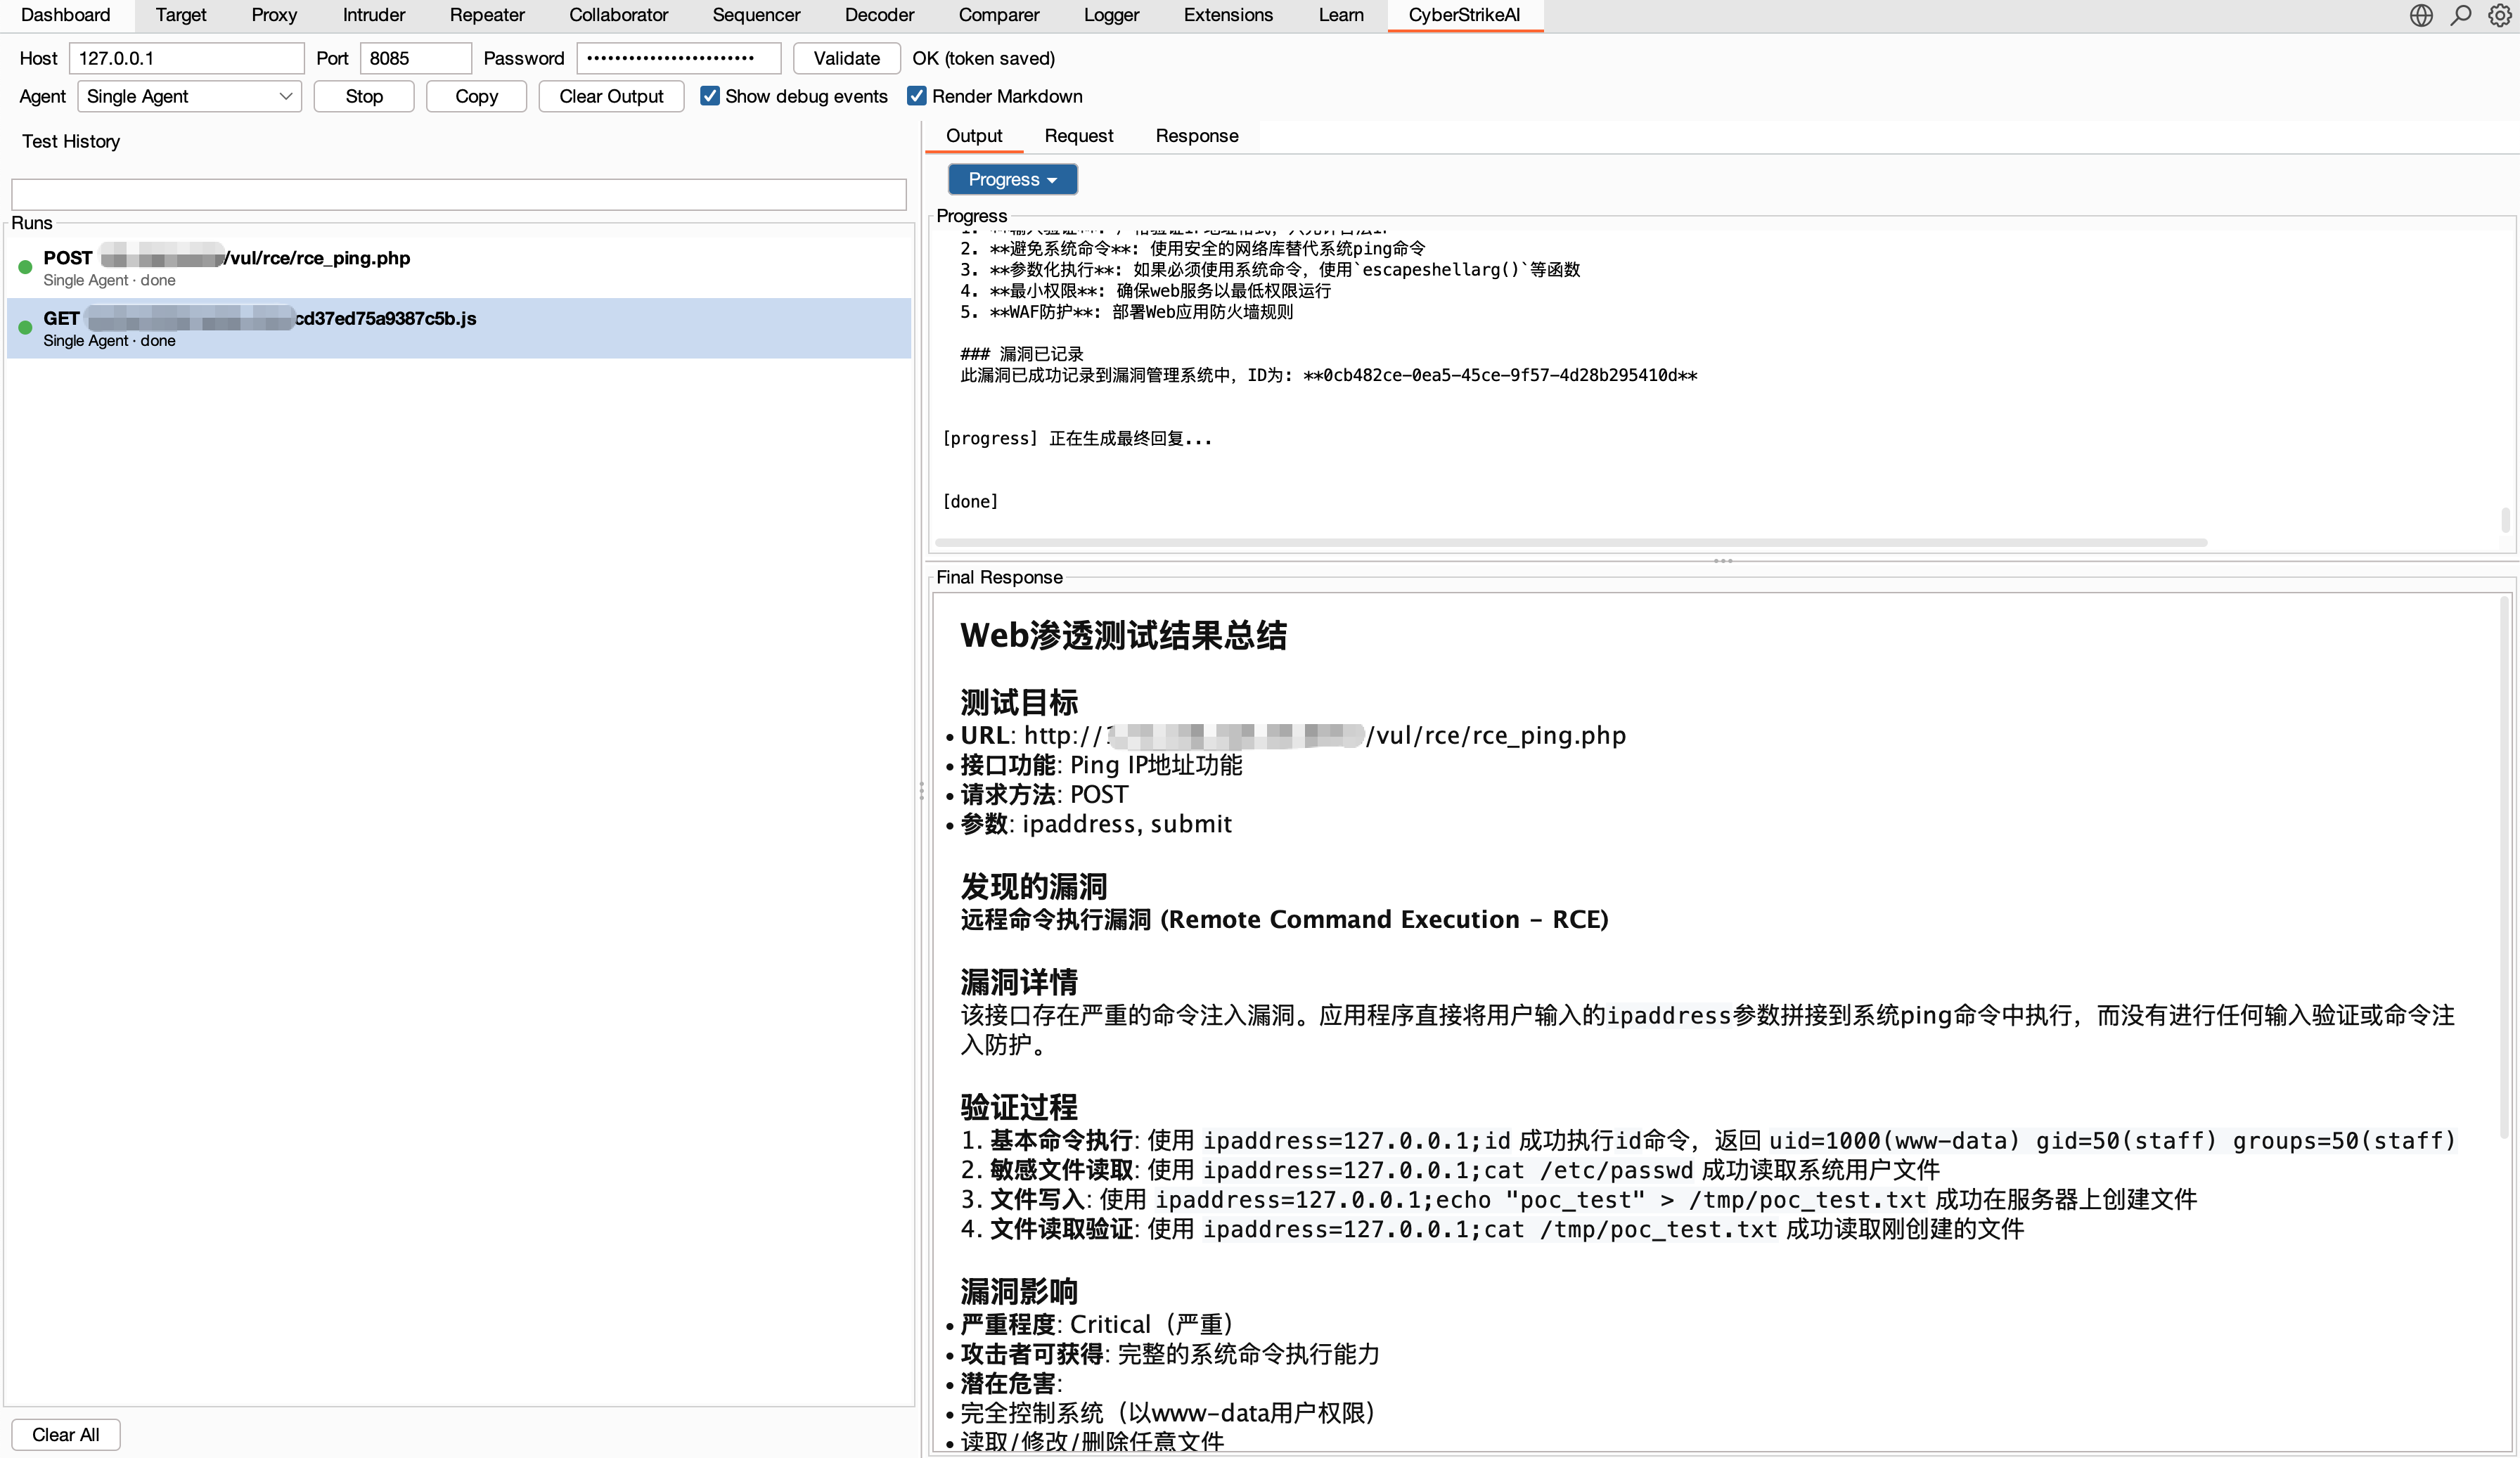
- **Burp Suite extension**: `plugins/burp-suite/cyberstrikeai-burp-extension/`
Build output: `plugins/burp-suite/cyberstrikeai-burp-extension/dist/cyberstrikeai-burp-extension.jar`
Docs: `plugins/burp-suite/cyberstrikeai-burp-extension/README.md`
## Tool Overview
CyberStrikeAI ships with 100+ curated tools covering the whole kill chain:
- **Network Scanners** – nmap, masscan, rustscan, arp-scan, nbtscan
- **Web & App Scanners** – sqlmap, nikto, dirb, gobuster, feroxbuster, ffuf, httpx
- **Vulnerability Scanners** – nuclei, wpscan, wafw00f, dalfox, xsser
- **Subdomain Enumeration** – subfinder, amass, findomain, dnsenum, fierce
- **Network Space Search Engines** – fofa_search, zoomeye_search
- **API Security** – graphql-scanner, arjun, api-fuzzer, api-schema-analyzer
- **Container Security** – trivy, clair, docker-bench-security, kube-bench, kube-hunter
- **Cloud Security** – prowler, scout-suite, cloudmapper, pacu, terrascan, checkov
- **Binary Analysis** – gdb, radare2, ghidra, objdump, strings, binwalk
- **Exploitation** – metasploit, msfvenom, pwntools, ropper, ropgadget
- **Password Cracking** – hashcat, john, hashpump
- **Forensics** – volatility, volatility3, foremost, steghide, exiftool
- **Post-Exploitation** – linpeas, winpeas, mimikatz, bloodhound, impacket, responder
- **CTF Utilities** – stegsolve, zsteg, hash-identifier, fcrackzip, pdfcrack, cyberchef
- **System Helpers** – exec, create-file, delete-file, list-files, modify-file
## Basic Usage
### Quick Start (One-Command Deployment)
**Prerequisites:**
- Go 1.21+ ([Install](https://go.dev/dl/))
- Python 3.10+ ([Install](https://www.python.org/downloads/))
**One-Command Deployment:**
```bash
git clone https://github.com/Ed1s0nZ/CyberStrikeAI.git
cd CyberStrikeAI-main
chmod +x run.sh && ./run.sh
```
The `run.sh` script will automatically:
- ✅ Check and validate Go & Python environments
- ✅ Create Python virtual environment
- ✅ Install Python dependencies
- ✅ Download Go dependencies
- ✅ Build the project
- ✅ Start the server
**First-Time Configuration:**
1. **Configure OpenAI-compatible API** (required before first use)
- Open http://localhost:8080 after launch
- Go to `Settings` → Fill in your API credentials:
```yaml
openai:
api_key: "sk-your-key"
base_url: "https://api.openai.com/v1" # or https://api.deepseek.com/v1
model: "gpt-4o" # or deepseek-chat, claude-3-opus, etc.
```
- Or edit `config.yaml` directly before launching
2. **Login** - Use the auto-generated password shown in the console (or set `auth.password` in `config.yaml`)
3. **Install security tools (optional)** - Install tools as needed:
```bash
# macOS
brew install nmap sqlmap nuclei httpx gobuster feroxbuster subfinder amass
# Ubuntu/Debian
sudo apt-get install nmap sqlmap nuclei httpx gobuster feroxbuster
```
AI automatically falls back to alternatives when a tool is missing.
**Alternative Launch Methods:**
```bash
# Direct Go run (requires manual setup)
go run cmd/server/main.go
# Manual build
go build -o cyberstrike-ai cmd/server/main.go
./cyberstrike-ai
```
**Note:** The Python virtual environment (`venv/`) is automatically created and managed by `run.sh`. Tools that require Python (like `api-fuzzer`, `http-framework-test`, etc.) will automatically use this environment.
### Version Update (No Breaking Changes)
**CyberStrikeAI one-click upgrade (recommended):**
1. (First time) enable the script: `chmod +x upgrade.sh`
2. Upgrade with: `./upgrade.sh` (optional flags: `--tag vX.Y.Z`, `--no-venv`, `--preserve-custom`, `--yes`)
3. The script will back up your `config.yaml` and `data/`, upgrade the code from GitHub Release, update `config.yaml`'s `version`, then restart the server.
Recommended one-liner:
`chmod +x upgrade.sh && ./upgrade.sh --yes`
If something goes wrong, you can restore from `.upgrade-backup/` (or manually copy `/data` and `config.yaml` back) and run `./run.sh` again.
Requirements / tips:
* You need `curl` or `wget` for downloading Release packages.
* `rsync` is recommended/required for the safe code sync.
* If GitHub API rate-limits you, set `export GITHUB_TOKEN="..."` before running `./upgrade.sh`.
⚠️ **Note:** This procedure only applies to version updates without compatibility or breaking changes. If a release includes compatibility changes, this method may not apply.
**Examples:** No breaking changes — e.g. v1.3.1 → v1.3.2; with breaking changes — e.g. v1.3.1 → v1.4.0. The project follows [Semantic Versioning](https://semver.org/) (SemVer): when only the patch version (third number) changes, this upgrade path is usually safe; when the minor or major version changes, config, data, or APIs may have changed — check the release notes before using this method.
### Core Workflows
- **Conversation testing** – Natural-language prompts trigger toolchains with streaming SSE output.
- **Single vs multi-agent** – With `multi_agent.enabled: true`, the chat UI can switch between **single** (classic ReAct loop) and **multi** (Eino DeepAgent + `task` sub-agents). Multi mode uses `/api/multi-agent/stream`; tools are bridged from the same MCP stack as single-agent.
- **Role-based testing** – Select from predefined security testing roles (Penetration Testing, CTF, Web App Scanning, API Security Testing, etc.) to customize AI behavior and tool availability. Each role applies custom system prompts and can restrict available tools for focused testing scenarios.
- **Tool monitor** – Inspect running jobs, execution logs, and large-result attachments.
- **History & audit** – Every conversation and tool invocation is stored in SQLite with replay.
- **Conversation groups** – Organize conversations into groups, pin important groups, rename or delete groups via context menu.
- **Vulnerability management** – Create, update, and track vulnerabilities discovered during testing. Filter by severity (critical/high/medium/low/info), status (open/confirmed/fixed/false_positive), and conversation. View statistics and export findings.
- **Batch task management** – Create task queues with multiple tasks, add or edit tasks before execution, and run them sequentially. Each task executes as a separate conversation, with status tracking (pending/running/completed/failed/cancelled) and full execution history.
- **WebShell management** – Add and manage WebShell connections (PHP/ASP/ASPX/JSP or custom). Use the virtual terminal to run commands, the file manager to list, read, edit, upload, and delete files, and the AI assistant tab to drive scripted tests with per-connection conversation history. Connections are stored in SQLite; supports GET/POST and configurable command parameter (e.g. IceSword/AntSword style).
- **Settings** – Tweak provider keys, MCP enablement, tool toggles, and agent iteration limits.
### Built-in Safeguards
- Required-field validation prevents accidental blank API credentials.
- Auto-generated strong passwords when `auth.password` is empty.
- Unified auth middleware for every web/API call (Bearer token flow).
- Timeout and sandbox guards per tool, plus structured logging for triage.
## Advanced Usage
### Role-Based Testing
- **Predefined roles** – System includes 12+ predefined security testing roles (Penetration Testing, CTF, Web App Scanning, API Security Testing, Binary Analysis, Cloud Security Audit, etc.) in the `roles/` directory.
- **Custom prompts** – Each role can define a `user_prompt` that prepends to user messages, guiding the AI to adopt specialized testing methodologies and focus areas.
- **Tool restrictions** – Roles can specify a `tools` list to limit available tools, ensuring focused testing workflows (e.g., CTF role restricts to CTF-specific utilities).
- **Skills integration** – Roles can attach security testing skills. Skill names are added to system prompts as hints, and AI agents can access skill content on-demand using the `read_skill` tool.
- **Easy role creation** – Create custom roles by adding YAML files to the `roles/` directory. Each role defines `name`, `description`, `user_prompt`, `icon`, `tools`, `skills`, and `enabled` fields.
- **Web UI integration** – Select roles from a dropdown in the chat interface. Role selection affects both AI behavior and available tool suggestions.
**Creating a custom role (example):**
1. Create a YAML file in `roles/` (e.g., `roles/custom-role.yaml`):
```yaml
name: Custom Role
description: Specialized testing scenario
user_prompt: You are a specialized security tester focusing on API security...
icon: "\U0001F4E1"
tools:
- api-fuzzer
- arjun
- graphql-scanner
skills:
- api-security-testing
- sql-injection-testing
enabled: true
```
2. Restart the server or reload configuration; the role appears in the role selector dropdown.
### Multi-Agent Mode (Eino DeepAgent)
- **What it is** – An optional second execution path based on CloudWeGo **Eino** `adk/prebuilt/deep`: a **coordinator** (main agent) calls a **`task`** tool to run ephemeral **sub-agents**, each with its own model loop and tool set derived from the current role.
- **Markdown agents** – Under `agents_dir` (default `agents/`, relative to `config.yaml`), define:
- **Orchestrator**: file name `orchestrator.md` *or* any `.md` with front matter `kind: orchestrator` (only **one** per directory). Sets Deep agent name/id, description, and optional full system prompt (body); if the body is empty, `multi_agent.orchestrator_instruction` and then Eino defaults apply.
- **Sub-agents**: other `*.md` files (YAML front matter + body as instruction). They are **not** used as `task` targets if classified as orchestrator.
- **Management** – Web UI: **Agents → Agent management** for CRUD on Markdown agents; API prefix `/api/multi-agent/markdown-agents`.
- **Config** – `multi_agent` block in `config.yaml`: `enabled`, `default_mode` (`single` | `multi`), `robot_use_multi_agent`, `batch_use_multi_agent`, `max_iteration`, `orchestrator_instruction`, optional YAML `sub_agents` merged with disk (same `id` → Markdown wins).
- **Details** – Streaming events, robots, batch queue, and troubleshooting: **[docs/MULTI_AGENT_EINO.md](docs/MULTI_AGENT_EINO.md)**.
### Skills System
- **Predefined skills** – System includes 20+ predefined security testing skills (SQL injection, XSS, API security, cloud security, container security, etc.) in the `skills/` directory.
- **Skill hints in prompts** – When a role is selected, skill names attached to that role are added to the system prompt as recommendations. Skill content is not automatically injected; AI agents must use the `read_skill` tool to access skill details when needed.
- **On-demand access** – AI agents can also access skills on-demand using built-in tools (`list_skills`, `read_skill`), allowing dynamic skill retrieval during task execution.
- **Structured format** – Each skill is a directory containing a `SKILL.md` file with detailed testing methods, tool usage, best practices, and examples. Skills support YAML front matter for metadata.
- **Custom skills** – Create custom skills by adding directories to the `skills/` directory. Each skill directory should contain a `SKILL.md` file with the skill content.
**Creating a custom skill:**
1. Create a directory in `skills/` (e.g., `skills/my-skill/`)
2. Create a `SKILL.md` file in that directory with the skill content
3. Attach the skill to a role by adding it to the role's `skills` field in the role YAML file
### Tool Orchestration & Extensions
- **YAML recipes** in `tools/*.yaml` describe commands, arguments, prompts, and metadata.
- **Directory hot-reload** – pointing `security.tools_dir` to a folder is usually enough; inline definitions in `config.yaml` remain supported for quick experiments.
- **Large-result pagination** – outputs beyond 200 KB are stored as artifacts retrievable through the `query_execution_result` tool with paging, filters, and regex search.
- **Result compression** – multi-megabyte logs can be summarized or losslessly compressed before persisting to keep SQLite lean.
**Creating a custom tool (typical flow)**
1. Copy an existing YAML file from `tools/` (for example `tools/sample.yaml`).
2. Update `name`, `command`, `args`, and `short_description`.
3. Describe positional or flag parameters in `parameters[]` so the agent knows how to build CLI arguments.
4. Provide a longer `description`/`notes` block if the agent needs extra context or post-processing tips.
5. Restart the server or reload configuration; the new tool becomes available immediately and can be enabled/disabled from the Settings panel.
### Attack-Chain Intelligence
- AI parses each conversation to assemble targets, tools, vulnerabilities, and relationships.
- The web UI renders the chain as an interactive graph with severity scoring and step replay.
- Export the chain or raw findings to external reporting pipelines.
### WebShell Management
- **Connections** – From the Web UI, go to **WebShell Management** to add, edit, or delete WebShell connections. Each connection stores: Shell URL, password/key, shell type (PHP, ASP, ASPX, JSP, Custom), request method (GET/POST), command parameter name (default `cmd`), and an optional remark; all records persist in SQLite and are compatible with common clients such as IceSword and AntSword.
- **Virtual terminal** – After selecting a connection, use the **Virtual terminal** tab to run arbitrary commands with history and quick commands (whoami/id/ls/pwd etc.). Output is streamed in the browser, and Ctrl+L clears the screen.
- **File manager** – Use the **File manager** tab to list directories, read or edit files, delete files, create folders/files, upload files (including chunked uploads for large files), rename paths, and download selected files. Path navigation supports breadcrumbs, parent directory jumps, and name filtering.
- **AI assistant** – Use the **AI assistant** tab to chat with an agent that understands the current WebShell connection, automatically runs tools and shell commands, and maintains per-connection conversation history with a sidebar of previous sessions.
- **Connectivity test** – Use **Test connectivity** to verify that the shell URL, password, and command parameter are correct before running commands (sends a lightweight `echo 1` check).
- **Persistence** – All WebShell connections and AI conversations are stored in SQLite (same database as conversations), so they persist across restarts.
### MCP Everywhere
- **Web mode** – ships with HTTP MCP server automatically consumed by the UI.
- **MCP stdio mode** – `go run cmd/mcp-stdio/main.go` exposes the agent to Cursor/CLI.
- **External MCP federation** – register third-party MCP servers (HTTP, stdio, or SSE) from the UI, toggle them per engagement, and monitor their health and call volume in real time.
- **Optional MCP servers** – the [`mcp-servers/`](mcp-servers/README.md) directory provides standalone MCPs (e.g. reverse shell). They speak standard MCP over stdio and work with CyberStrikeAI (Settings → External MCP), Cursor, VS Code, and other MCP clients.
#### MCP stdio quick start
1. **Build the binary** (run from the project root):
```bash
go build -o cyberstrike-ai-mcp cmd/mcp-stdio/main.go
```
2. **Wire it up in Cursor**
Open `Settings → Tools & MCP → Add Custom MCP`, pick **Command**, then point to the compiled binary and your config:
```json
{
"mcpServers": {
"cyberstrike-ai": {
"command": "/absolute/path/to/cyberstrike-ai-mcp",
"args": [
"--config",
"/absolute/path/to/config.yaml"
]
}
}
}
```
Replace the paths with your local locations; Cursor will launch the stdio server automatically.
#### MCP HTTP quick start (Cursor / Claude Code)
The HTTP MCP server runs on a separate port (default `8081`) and supports **header-based authentication** so only clients that send the correct header can call tools.
1. **Enable MCP in config** – In `config.yaml` set `mcp.enabled: true` and optionally `mcp.host` / `mcp.port`. For auth (recommended if the port is reachable from the network), set:
- `mcp.auth_header` – header name (e.g. `X-MCP-Token`);
- `mcp.auth_header_value` – secret value. **Leave it empty** if you want the server to **auto-generate** a random token on first start and write it back to the config.
2. **Start the service** – Run `./run.sh` or `go run cmd/server/main.go`. The MCP endpoint is `http://
 *The dashboard provides a comprehensive overview of system runtime status, security vulnerabilities, tool usage, and knowledge base, helping users quickly understand the platform's core features and current state.*
### Core Features Overview
*The dashboard provides a comprehensive overview of system runtime status, security vulnerabilities, tool usage, and knowledge base, helping users quickly understand the platform's core features and current state.*
### Core Features Overview


 CyberStrikeAI has joined [404Starlink](https://github.com/knownsec/404StarLink)
## TCH Top-Ranked Intelligent Pentest Project
CyberStrikeAI has joined [404Starlink](https://github.com/knownsec/404StarLink)
## TCH Top-Ranked Intelligent Pentest Project
